
| |
The first "lesson" in our classroom will be on ways of starting peyote stitch. There are some wonderful places on the internet to find the basics of peyote stitch so I am not going to repeat the stitch itself.
What I am going to talk about is "starting" a new piece of work using a "take-off" strip. My thanks goes out to Janie Warnick for the origin of this "light bulb" of an idea!
There are almost as many ways of starting and working peyote stitch as there are beaders! We each have our own little ways of doing things. We all want to save ourselves time and effort as well. I came across this idea on the internet and asked permission to expand upon it.
The premise behind this is to be able to begin peyote stitch easily, quickly and evenly. And, you will be able to use this strip over and over!
I call this a `take-off' strip because it allows you to take off -- getting right into your pattern. It also comes by its name from the fact that you take it off your `real' project eventually. You don't have to spend time beading extra rows, then spend more time taking them off bead by bead (if you use that method) -- each and every time you want to begin a new piece of beadwork!
The take off strip can be flat peyote or tubular peyote, but I have found you can use a flat peyote take-off strip to begin tubular pieces! (see bottom of page).
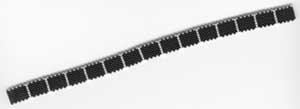
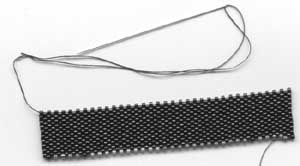
Begin the take-off piece just as you would normally start and work peyote. Solid color striped `marker' beads every 5 or 10 columns makes it easier to count later on. Work a piece with enough rows for you to hold comfortably while starting new pieces (at least half an inch), being careful not to twist the work on the first 3 rows. See photo 1.
As long as your take-off piece is larger (longer/wider) than most of the patterns you might want to make, you will be able to position the start of any new piece any place you want -- as long as you don't run out of strip!
You want to use the best quality and consistency of beads for your take-off piece. In the long run, it may help your work be better and you will be using this strip for a long time. Don't think just because it's not `real' work, you can use inferior or `left over' beads! Think Quality always. Your attitude helps, too! The take-off strip helps you do your work better and faster. Give it some respect!
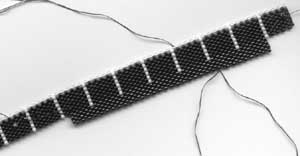
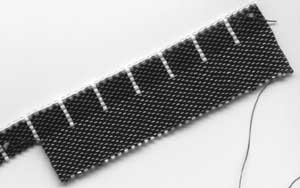
To use your new take-off strip, tie a stop bead onto a piece of thread (thread can be any color and just long enough for one row - you will be cutting and pulling it out later so you may use a left over piece) and thread your needle. You will put your threaded needle (with the stop bead on the end) into your take-off piece half an inch away from where you want the first bead of the first `real' row to be. Just through one bead and back on top so that the thread is laying on top of your take off strip (yet it's not in the way and your thread is anchored). Do not weave this thread in! You will pull it out later! Leave it on top of the work so you can see it easily to pull it out. Bring the needle out where you want the first bead of the first row of the new work to be. See photos 2 and 3. All of this may sound confusing at first, but it will make sense once you sit down and try it!
Work across the first row (following your pattern), being careful not to snag the other threads previously woven in. At the end of the row, put the needle into a bead of the take off strip half an inch away, but again not tied off or woven in. (If the last bead is loose, it's ok. You will catch it into the work on the next row). You will thread on another stop bead at this point and tie it on -- down close to the beads of your strip. This will anchor it. Trim thethread ends from both stop beads to about an inch -- just enough to hold onto while cutting and pulling this thread out later. See photos 2 and 3.
With a new length of thread (this one will be permanent), take another stop bead and about 6" to 8" from the end, loop the thread through this bead 3 times. You are leaving enough tail to weave into your `real' piece later on and anchoring the thread at the same time. Put your threaded needle into the take off strip a half inch from where you want to begin again. Work your way over to the place where your next bead row should start -- again taking care not to snag any previous threads -- and proceed with your pattern. After you have worked at least a half inch, you may remove the looped into bead and work the thread tail into your work -- NOT into the take-off strip!
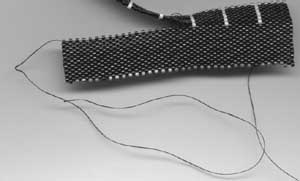
You may remove your take-off strip when you have enough rows worked for you to be comfortable holding your new work. Carefully cut the first stop bead off the work. You should be able to pull the two pieces of beadwork apart, slowly and carefully, and eventually that first thread length can be removed and discarded. Continue beading as usual! See photo 4. The technique will be the same if you are using a tubular take off strip.
To use a flat peyote take-off strip for tubular peyote, make certain your strip has enough columns across plus a few more for overlap. Start your piece as usual (with the first row of the pattern) and as you come to the end of the first row, where you should step down (or step up) for the next tubular row, overlap the take off strip to make this work, carefully pulling the tension on your beadwork. Just let the strip overlap and hang there. Tension carefully and work the second row. At this point, you want to bring in your form (bathroom tissue tube, etc...) and measure it for fit carefully. Work around your form as usual, keeping the tension under control until you have worked at least half an inch of tubular peyote. Then you may remove the take-off strip and proceed as usual. This may be a little awkward at first, but with a little practice it will be an easy start and you won't have to make multiple tubular take-off strips (all amulet bags don't have the same number of beads around!).
| | Home | News | Books | Shopping | Gallery |Free Stuff | Classroom |
| About the Artist | Other stuff | Links | eMail | |